Hello!
I'm starting a build thread for a DIY project that I'm working on (if this should be in another forum section, mods please let me know). The sheer cost of consumer/prosumer grade UV sterilizers was enough to motivate me to try to build my own.
Quick required safety disclaimer:
Even brief exposure to intense UV radiation is harmful to the eyes and skin as is high-current (wall voltage) electricity. Both will be utilized to some extent in this build as would any consumer grade UV sterilizer. While I have a modest amount of experience with plumbing at this point and past electrical projects I am by no means a professional and you should not attempt to do duplicate what you see here. Do your own research. Remember, safetythird first. Please don't try this at home. </warning>
Goal:
With that out of the way, my goal here is to build a DIY UV sterilizer for our reef system (currently ~200 gallons total system volume between the 120g display and 80g frag tank) for well under the cost of a consumer/prosumer unit. Thus far that seems quite feasible.
Requirements:
From what I've gathered the target wavelength needed for the sterilizer to be most effective is ~254nm and this is readily available in the form of either LED strips or traditional fluorescent UV bulbs. I'm going with UV bulbs because they will be much easier to replace when needed. The UV light emitted needs to be fully shielded when operating for safety. Only the water should be exposed to it and will benefit from being in close proximity to the bulb. Quartz glass is the material of choice for UV at 254nm because it lets most of the desired wavelength through. I'm starting with a 55w UV bulb which given the proper contact time (flow rate/surface area of the quartz coil) should be enough to properly treat our 200g system. The cost of this build must be under the cost of a prosumer unit.
Design:
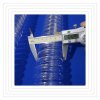
I'm going to try to flip the usual design inside out and put the water inside of the quartz instead of the bulb utilizing a lab grade quartz condensing coil like the one below, but properly sized to the length of the bulb in this application. At the moment I'm sourcing a custom prototype from Alibaba. This is likely to be the most expensive part of the project however we're still talking a fraction of what a properly sized off the shelf sterilizer would cost for a 200 gallon system.
Example quartz coil:

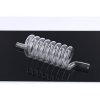
The UV bulb:

The enclosure housing the bulb and coil will be lined with a roll of adhesive aluminum (one of the few things that reflects the desired 254nm wavelength) to maximize the exposure of the water to the light as it passes through the quartz coil from the bottom of the unit to the top (this should help any air bubbles escape). The plan is to have the coil mounted vertically. As for the wall thickness of the quartz coil, I'm thinking of starting with something over 1mm which seems to be the typical thickness of the quartz sleeves used in off the shelf units (perhaps 2-3mm) . Doing so will slightly reduce the overall transmission of the UV light but the tradeoff may be worth it for the added structural integrity of the coil to avoid breakage from internal water pressure, during shipping, and handling during maintenance (replacing the quartz coil). Being a closed loop this will not be designed to handle the full flow of the system through it from the start. I can easily up-size the quartz coil later if I desired if I want additional flow through it (might required a slightly thicker quartz coil wall).
Safety:
As a precaution I'm thinking of adding a Neptune Apex optical sensor at the bottom of the enclosure to quickly detect any liquid and shut off all power to the ballast and utility pump feeding the closed-loop unit should a leak occur. The bulb socket will be at the top of the unit so any drips are unlikely to make it to an electrical contact. There should be no moisture inside the enclosure at all (it all passes through the quartz tube that spirals around the bulb). The external enclosure is just to safely shield the UV light inside of the unit and hold the quartz coil/bulb in place. I might add a maintenance viewing port made of UV-safe viewing glass to confirm proper operation while the unit is closed/on while protecting my eyes. The high voltage UV bulb ballast will be up out of the way in a waterproof enclosure with a drip-loop plugged into a GFCI outlet.
Parts ordered so far:
Bulb: PLT pL-L55W/TUV 55 watt dual-lamp UV bulb which utilizes a 2G11 4-pin socket - $28
Socket for the bulb: 2G11 - $6
Vertical/horizontal clip-on supports for the bulb - $2
Ballast for the bulb: Advance Centium ICN-2S54-T (54w, 2 lamp ballast) - $22
Wiring (misc 120v solid core copper insulated wire)
Parts needed: (more to follow):
Enclosure for the bulb/quartz coil
Waterproof enclosure box for the UV bulb ballast
Roll of aluminum reflective sheeting for lining inside of enclosure
Quartz coiled tube ~20" long, 3/4" OD tube, ~ 2.5" across coil ID - cost TBD (sourcing from Alibaba)
3/4" grommets/silicone fittings to plumb in
3/4" quarter turn ball valve to adjust flow
GPH in-line flow meter for Apex
6/10/2021:
I'll try to add more to this post as parts arrive and I start to fit the prototype together. At the moment I'm getting quotes for quartz coils from Alibaba. This will be the most expensive part of the build but ordering in bulk makes them cheaper. If this is successful I plan to replace the quartz sleeve and bulb as would be done with any UV sterilizer after 6-12 months so I will need to order more of them once I get the size/glass strength correct for this application.
6/11/2021:
I have this build cross-posted to R2R for additional visibility. Someone brought up the possible need for heat dissipation for the UV bulb inside the enclosure. I'm hoping that the flowing water through the quartz sleeve will act as a heat exchanger, carrying water heated by the ambient air inside the unit away back to the tank as it passes through the tube and reducing the overall temperature inside the enclosure. I will need to monitor the ambient temperature inside. If passive cooling doesn't work, an active approach may be needed. I had the idea to perhaps use extruded aluminum motor housing like the example photo below:

Aluminum is a great conductor for heat. It's been used in the past for external computer water cooling tower loops like the Zalman series below. Should additional cooling be needed this might be enough on it's own, or a fan could be added if necessary:

TLDR Disclaimer: Electricity and water don't mix. Radiation is bad for you, mkay. Don't try this at home.
I'm starting a build thread for a DIY project that I'm working on (if this should be in another forum section, mods please let me know). The sheer cost of consumer/prosumer grade UV sterilizers was enough to motivate me to try to build my own.
Quick required safety disclaimer:
Even brief exposure to intense UV radiation is harmful to the eyes and skin as is high-current (wall voltage) electricity. Both will be utilized to some extent in this build as would any consumer grade UV sterilizer. While I have a modest amount of experience with plumbing at this point and past electrical projects I am by no means a professional and you should not attempt to do duplicate what you see here. Do your own research. Remember, safety
Goal:
With that out of the way, my goal here is to build a DIY UV sterilizer for our reef system (currently ~200 gallons total system volume between the 120g display and 80g frag tank) for well under the cost of a consumer/prosumer unit. Thus far that seems quite feasible.
Requirements:
From what I've gathered the target wavelength needed for the sterilizer to be most effective is ~254nm and this is readily available in the form of either LED strips or traditional fluorescent UV bulbs. I'm going with UV bulbs because they will be much easier to replace when needed. The UV light emitted needs to be fully shielded when operating for safety. Only the water should be exposed to it and will benefit from being in close proximity to the bulb. Quartz glass is the material of choice for UV at 254nm because it lets most of the desired wavelength through. I'm starting with a 55w UV bulb which given the proper contact time (flow rate/surface area of the quartz coil) should be enough to properly treat our 200g system. The cost of this build must be under the cost of a prosumer unit.
Design:
I'm going to try to flip the usual design inside out and put the water inside of the quartz instead of the bulb utilizing a lab grade quartz condensing coil like the one below, but properly sized to the length of the bulb in this application. At the moment I'm sourcing a custom prototype from Alibaba. This is likely to be the most expensive part of the project however we're still talking a fraction of what a properly sized off the shelf sterilizer would cost for a 200 gallon system.
Example quartz coil:
The UV bulb:
The enclosure housing the bulb and coil will be lined with a roll of adhesive aluminum (one of the few things that reflects the desired 254nm wavelength) to maximize the exposure of the water to the light as it passes through the quartz coil from the bottom of the unit to the top (this should help any air bubbles escape). The plan is to have the coil mounted vertically. As for the wall thickness of the quartz coil, I'm thinking of starting with something over 1mm which seems to be the typical thickness of the quartz sleeves used in off the shelf units (perhaps 2-3mm) . Doing so will slightly reduce the overall transmission of the UV light but the tradeoff may be worth it for the added structural integrity of the coil to avoid breakage from internal water pressure, during shipping, and handling during maintenance (replacing the quartz coil). Being a closed loop this will not be designed to handle the full flow of the system through it from the start. I can easily up-size the quartz coil later if I desired if I want additional flow through it (might required a slightly thicker quartz coil wall).
Safety:
As a precaution I'm thinking of adding a Neptune Apex optical sensor at the bottom of the enclosure to quickly detect any liquid and shut off all power to the ballast and utility pump feeding the closed-loop unit should a leak occur. The bulb socket will be at the top of the unit so any drips are unlikely to make it to an electrical contact. There should be no moisture inside the enclosure at all (it all passes through the quartz tube that spirals around the bulb). The external enclosure is just to safely shield the UV light inside of the unit and hold the quartz coil/bulb in place. I might add a maintenance viewing port made of UV-safe viewing glass to confirm proper operation while the unit is closed/on while protecting my eyes. The high voltage UV bulb ballast will be up out of the way in a waterproof enclosure with a drip-loop plugged into a GFCI outlet.
Parts ordered so far:
Bulb: PLT pL-L55W/TUV 55 watt dual-lamp UV bulb which utilizes a 2G11 4-pin socket - $28
Socket for the bulb: 2G11 - $6
Vertical/horizontal clip-on supports for the bulb - $2
Ballast for the bulb: Advance Centium ICN-2S54-T (54w, 2 lamp ballast) - $22
Wiring (misc 120v solid core copper insulated wire)
Parts needed: (more to follow):
Enclosure for the bulb/quartz coil
Waterproof enclosure box for the UV bulb ballast
Roll of aluminum reflective sheeting for lining inside of enclosure
Quartz coiled tube ~20" long, 3/4" OD tube, ~ 2.5" across coil ID - cost TBD (sourcing from Alibaba)
3/4" grommets/silicone fittings to plumb in
3/4" quarter turn ball valve to adjust flow
GPH in-line flow meter for Apex
6/10/2021:
I'll try to add more to this post as parts arrive and I start to fit the prototype together. At the moment I'm getting quotes for quartz coils from Alibaba. This will be the most expensive part of the build but ordering in bulk makes them cheaper. If this is successful I plan to replace the quartz sleeve and bulb as would be done with any UV sterilizer after 6-12 months so I will need to order more of them once I get the size/glass strength correct for this application.
6/11/2021:
I have this build cross-posted to R2R for additional visibility. Someone brought up the possible need for heat dissipation for the UV bulb inside the enclosure. I'm hoping that the flowing water through the quartz sleeve will act as a heat exchanger, carrying water heated by the ambient air inside the unit away back to the tank as it passes through the tube and reducing the overall temperature inside the enclosure. I will need to monitor the ambient temperature inside. If passive cooling doesn't work, an active approach may be needed. I had the idea to perhaps use extruded aluminum motor housing like the example photo below:
Aluminum is a great conductor for heat. It's been used in the past for external computer water cooling tower loops like the Zalman series below. Should additional cooling be needed this might be enough on it's own, or a fan could be added if necessary:
TLDR Disclaimer: Electricity and water don't mix. Radiation is bad for you, mkay. Don't try this at home.
Attachments
Last edited: